Set up the Mobotix T24/T25 SIP server
| To make calls from one iRidium panel to another and from Mobotix call panel to iRidium and back it is necessary to configure the Mobotix SIP server correctly. Let's configure Mobotix in the mode of both the SIP server and the SIP client. |
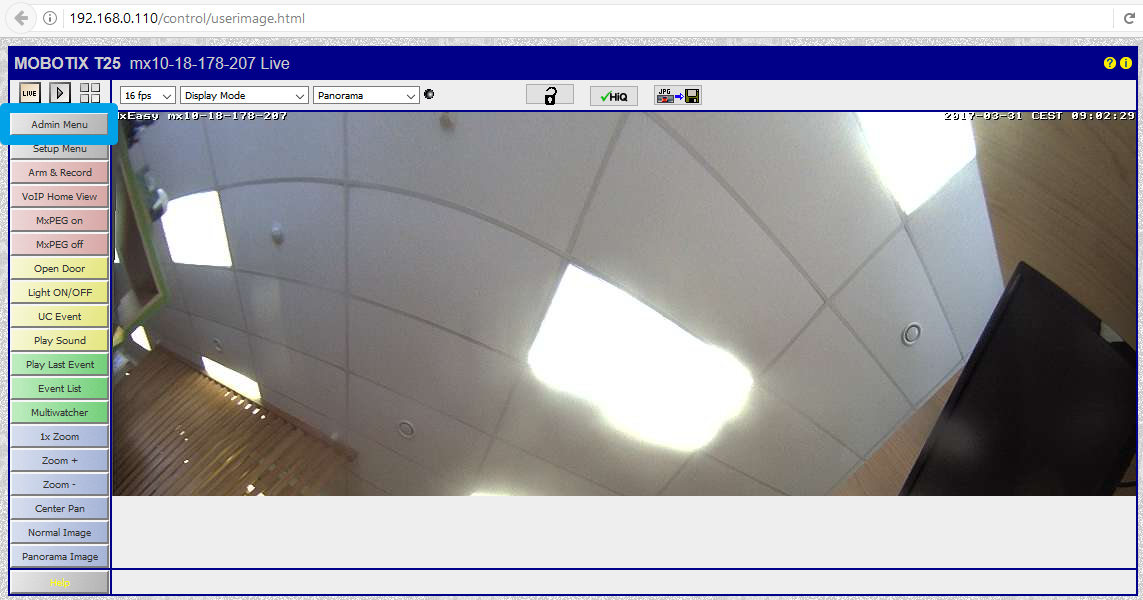
Open Mobotix T24/T25 web-interface in the a browser. To do this, go to the IP address of Mobotix and enter the admin login and password.
Press the "Admin Menu" button in the web interface:
We need to consistently configure the following subsections:
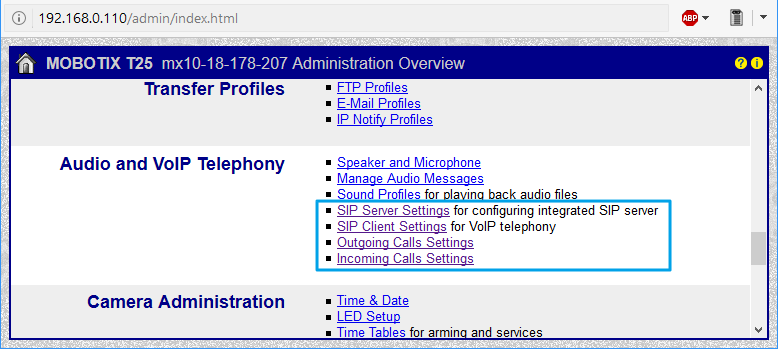
A detailed description of the configuration is provided below:
1. SIP Server Settings. Setting up a doorphone as a SIP server*
* If you have another device as a SIP server, skip this article.
Open the Audio and VoIP Telephony | SIP Server Settings submenu. Here you need to configure Mobotix as a SIP server and create a list of clients - select SIP addresses for each device that will make and receive calls (doorphones and mobile devices).
- Enable SIP server mode, If this particular Mobotix doorphone will switch calls between clients. Enter Realm: MX_SIP
- Create the required number of SIP clients. There must be at least two of them. The first client is the Mobotix doorphone, the second is the i3 pro application, which will communicate with it. Other clients are other intercoms or mobile devices.
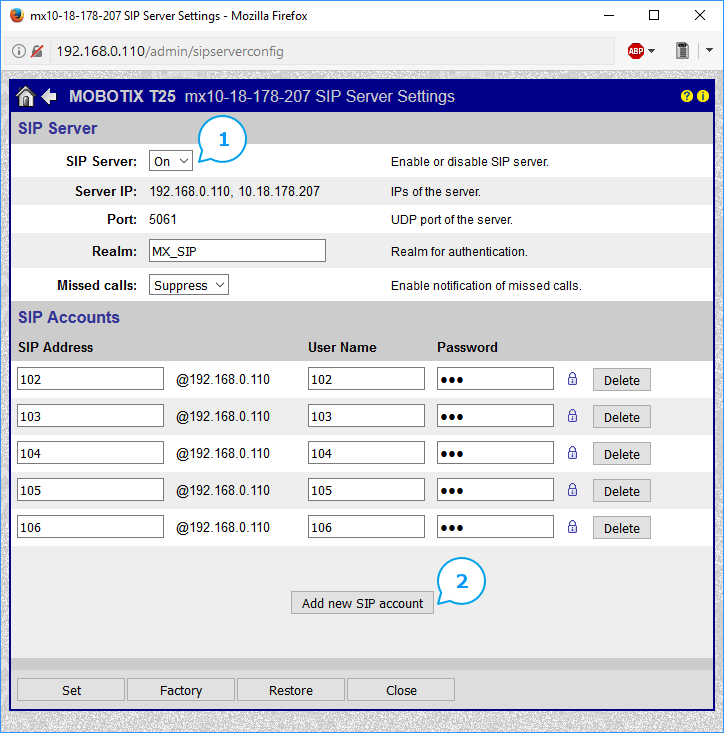
2. SIP Client Settings. Setting up the doorphone as a SIP client.
Open the Audio and VoIP Telephony | SIP Client Settings submenu. Here you need to configure Mobotix as a SIP client so that it can make and receive calls.
We are considering the option when one Mobotix works as a server and a client, so in the SIP Client Settings we specify that Mobotix as a client is connected to itself as to the server.
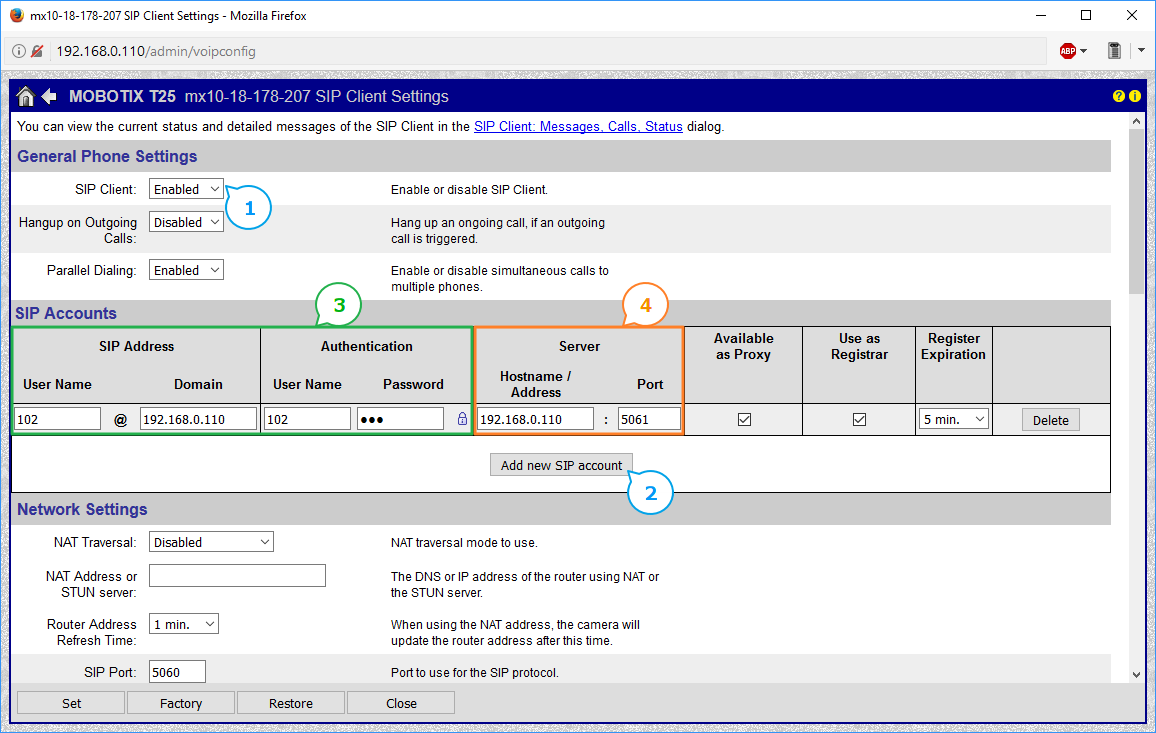
- Launch SIP Client - client mode to make and receive calls.
- Create ONE entry in the SIP Accounts list, you do not need to create multiple. The doorphone will be accessible by the address configured in this entry
- Enter the data for one of the accounts created earlier in SIP Server Settings. This account must be created first in SIP Server Settings:

- Specify the address of the SIP server to which the Mobotix doorphone will be connected. In our case, the SIP server address is the same as the client's address, but it will be different if the server is another device.
Scroll the SIP Client Settings down, configure the audio and video to achieve the maximum quality of сonnection:
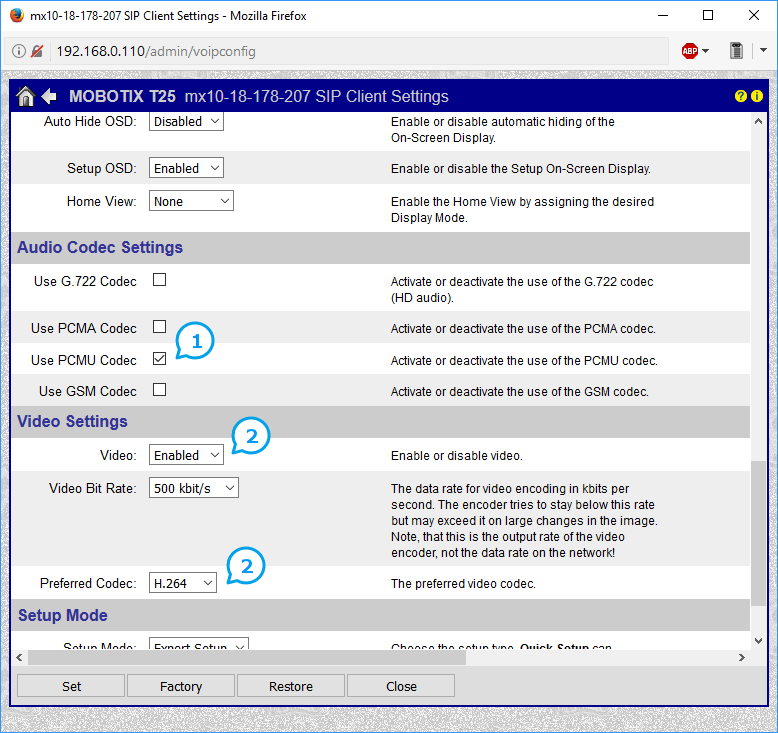
- Turn on the PCMA or PCMU codec
- Turn on H.264 video transmission
3. Outgoing Call Settings. Setting up the caller group that Mobotix calls when you tap the call
Open the Audio and VoIP Telephony | Outgoing Call Settings submenu. Here we will create a "call profile", in which we will add all the clients to which the Mobotix doorphone will try to call by pressing the "Сall" button.
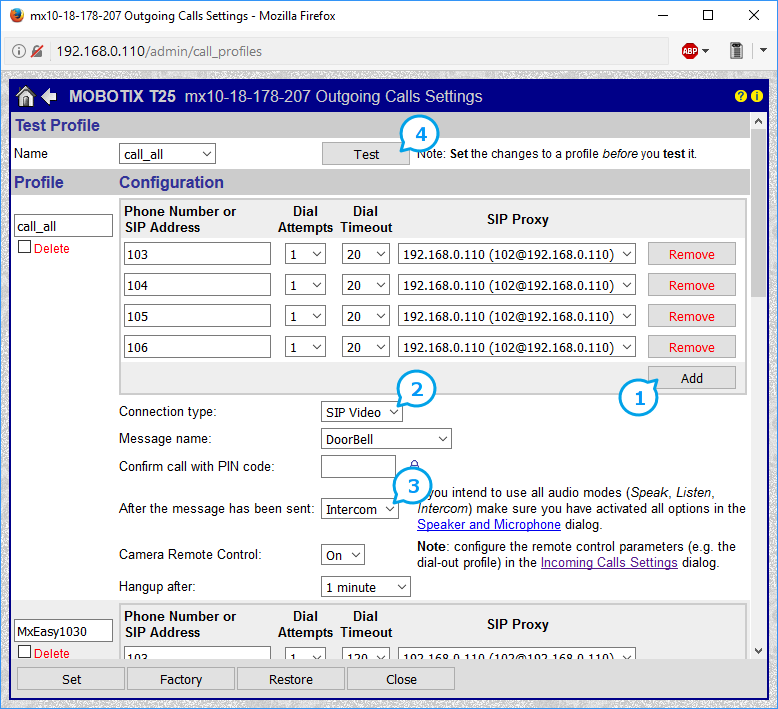
- Add to the list all SIP clients that need to be called when the button is pressed on the doorphone. SIP Proxy is the Mobotix doorphone address as a SIP client (the panel that Mobotix calls will see this address in the incoming call)
- Turn on dialer mode: SIP Video
- Turn on the talk mode: Intercom, to make a two-way communication
- Click the "Set" button, select the profile you created and click the "Test" button to simulate pressing the doorphone button.
Creating a call profile is not enough, you still need to configure its use when you press the "Сall" button on the doorphone:
4. Setting up calling the clients when you press a call on the doorphone
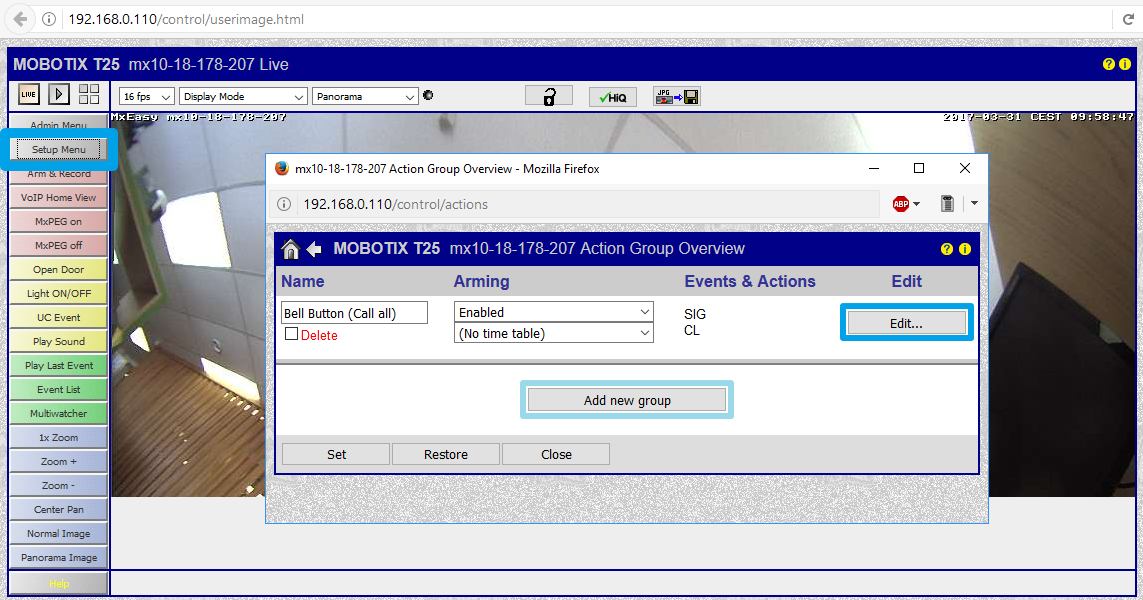
To do this, close Admin menu and return to the main page of the Mobotix web-interface.
Open the Setup menu, and in it the Event Control | Action Group Overview submenu.
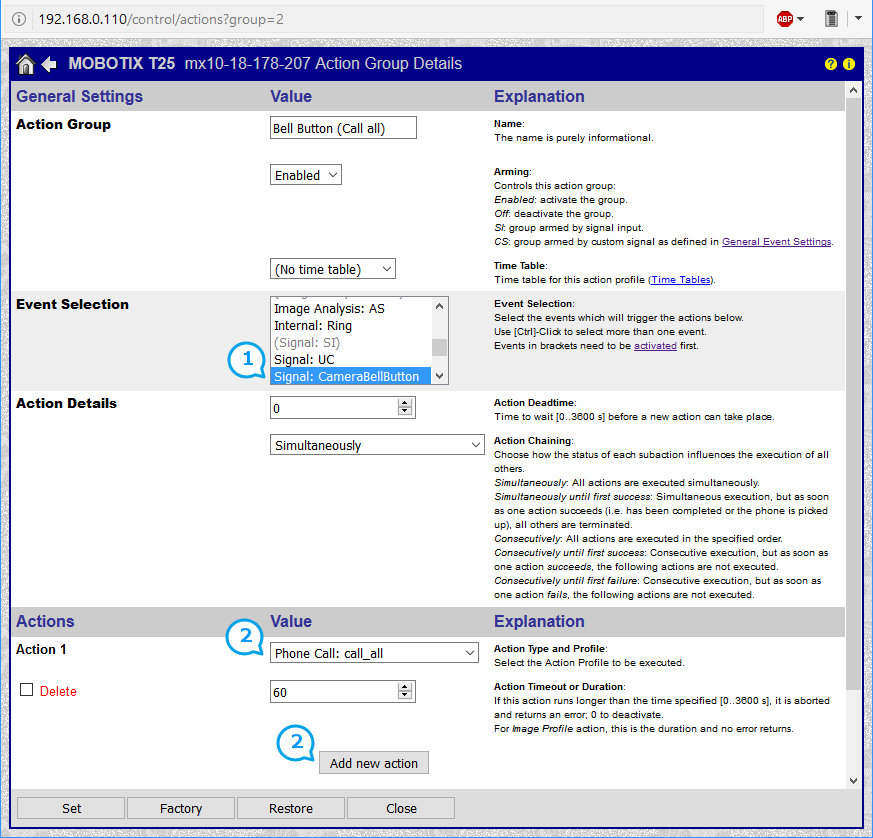
- In Event Selection, select the Signal: CameraBellButton action. The action is triggered when the "Bell" button on the doorphone is pressed.
- Click the Add new Action and select Phone Call: call_all. We created the call_all profile in the previous step of the configuration. Now when you click on the call, the call will go to all clients. As soon as one client answers, the calling other clients will be completed.
PS: Calling the profile from the button can also be configured using MxEasy. Return to the Admin menu via the Mobotix web-interface main page to continue the configuration.
.
5. Incoming Call Settings. Setting up the doorphone permissions to receive incoming calls.
In the Admin menu open the Audio and VoIP Telephony | Incoming Call Settings submenu. The rules for receiving calls by the doorphone are configured here.
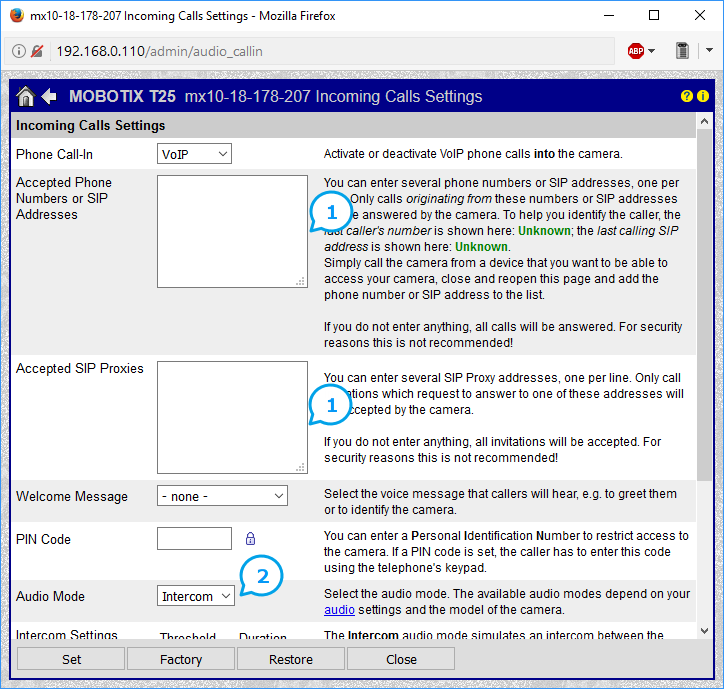
- Clear these fields if the doorphone should receive calls from all clients. If not from all - enter the list of clients, as written in the instructions to the doorphone.
- Turn on the Intercom mode for incoming calls so that the communication is two-way
6. Setting up the iRidium project to connect i3 pro and Mobotix
Download the Mobotix SIP project for tablet and smartphone. This project is specially created to connect i3 pro with Mobotix. It allows you to watch video from the doorphone camera at any time (without making a call), call a doorphone and accept a call. It can work with several doorphones.
With a certain configuration, the project can receive Push notifications from the Mobotix SIP server when the i3 pro is closed or minimized.
Stages of configuring the project:
6.1. Setting up the SIP driver to connect to the Mobotix SIP server
6.2. Setting up the script to receive video from the cameras and the for the operation of doorphone "Call" buttons
6.3. [Optionaly] Setting up call notification when i3 pro is closed
6.1. Setting up the SIP driver
Open the Mobotix SIP project in iRidium Studio on PC, select the SIP driver and set up:
- Host: the IP-address of the Mobotix SIP server
- SIP ID: the SIP client's number he uses in i3 pro (we created clients in the SIP Server Settings, select free number)
- Caller ID: the client's name (same as SIP ID or any other)
- Password: the client's password, configured on the SIP server
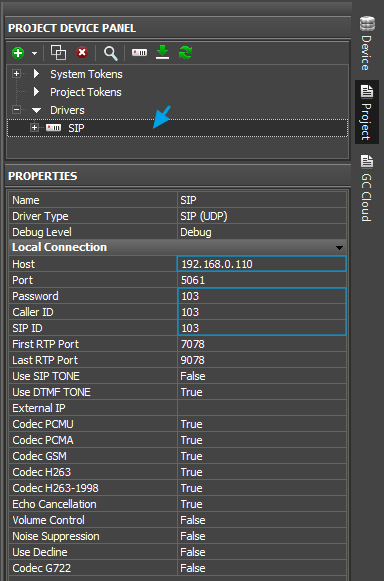
Leave the other settings by default, they are specially configured to connect to the Mobotix SIP server .
If you are using another SIP server (not Mobotix), the settings Port, First RTP Port, Last RTP Port may be different. Save the project.
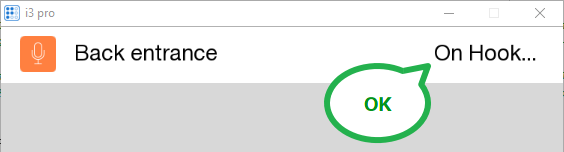
Launch the project in iRidium Studio > Emulator, open the page with the doorphone.
If the connection to the SIP server is successful you will see the "On Hook ..." status in the upper right corner of the doorphone window:
After this, configure the script in the project, It is needed to receive video from the camera and make calls to the doorphone:
6.2. Setting up the script of the Mobotix SIP project
This script will provide a call to the doorphone when you press the "Сall" button in the project, process Push notifications if you configure sending Push from Mobotix, and display the video stream from the Mobotix camera.
Click the "JS" button on the iRidium Studio toolbar to go to the script editor. Select the script file "Mobotix_DoorPhone_ADD":
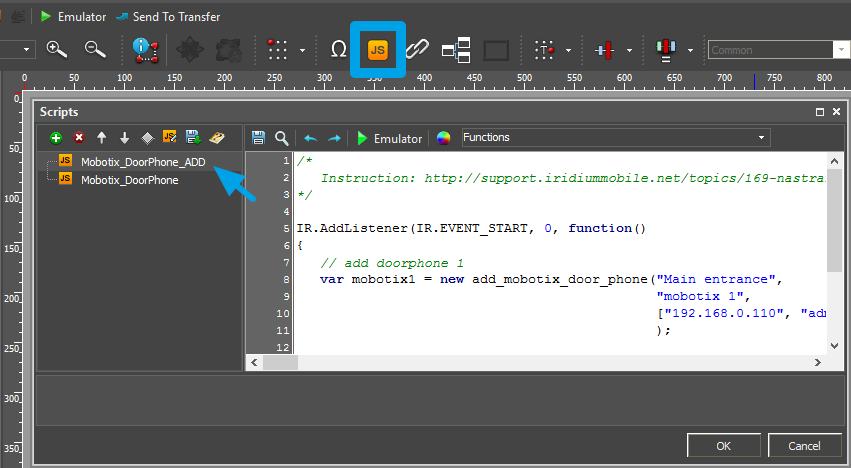
For example, configure a connection with one doorphone. For this you need to create one set of settings in the script (comments are removed):
IR.AddListener(IR.EVENT_START, 0, function()
{
   var mobotix1 = new add_mobotix_door_phone("Main entrance",
                  "mobotix 1",
                  ["192.168.0.110", "admin", "meinsm", "102"]
                  );
});
In this example:
- "Main entrance" - a random name for your doorphone. It will be displayed in the visualization interface when you open the doorphone page and while an incoming call
- "mobotix 1" - pop-up page name in the visualization interface that displays video from the doorphone camera, "call" button, "Open the door / Switch the light buttons". This pop-up contains a special set of graphic elements. To create a new pop you need to copy the available ones. Do not remove items from the pop-up (if it is necessary, you can move them out of the pop-up range)
- "192.168.0.110" - Mobotix doorphone IP-address (the doorphone from which you need to receive a video stream)
- "admin" - admin login, which you use to enter the Mobotix doorphone web-interface
- "meinsm" - admin password, which you use to enter the Mobotix doorphone web-interface
- "102" - doorphone SIP address as a SIP client (you configured it in the Admin menu of the doorphone, in the SIP Client Settings submenu)
If there are two or more doorphones you need to create two or more sets of settings by the principle:
IR.AddListener(IR.EVENT_START, 0, function()
{
    var mobotix1 = new add_mobotix_door_phone(...);
    var mobotix2 = new add_mobotix_door_phone(...);
    ...
    var mobotixN = new add_mobotix_door_phone(...);
});
Example of the "Mobotix_DoorPhone_ADD" file for two doorphones (comments removed):
IR.AddListener(IR.EVENT_START, 0, function()
{
    var mobotix1 = new add_mobotix_door_phone("Main entrance",
                  "mobotix 1",
                  ["192.168.0.110", "admin", "meinsm", "102"]
                  );

    var mobotix2 = new add_mobotix_door_phone("Back entrance",
                  "mobotix 2",
                  ["192.168.0.111", "admin", "meinsm", "104"]
                  );
});
Save the script and project.
Launch the project in iRidium Studio > Emulator, open the page with the configured doorphone. If the script is correctly configured, you will see the video from the doorphone camera, and when you press the "Call button" you will call the Mobotix doorphone:
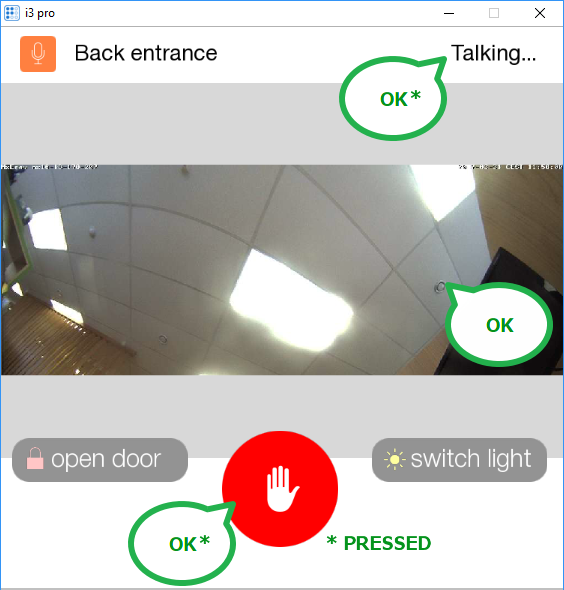
If the light control and door opening are connected to the dry contacts of the doorphone, the "open door" and "Switch light" buttons will also work.
6.3. [optionaly] Setting up call notification when i3 pro is closed
If you do not configure notifications for i3 pro, the application will not receive calls from the doorphone when it is closed or minimized. This means that without configuration only wall panels from i3 pro where the application is open all the time will receive calls.
For mobile devices where the application is not always open, you need to configure the PC (or other hardware solution) with the iRidium Server program and, according to the instructions, set up sending call from Mobotix to i3 pro via iRidium Server:
7. Finish the setting. Upload the project in iRidium Cloud
Save the finished project. It can be combined with your own visualization project or used independently.
If you have configured 6.3 (sending notifications), Mobotix SIP projects must be downloaded on the control panel via the iRidium Cloud (see the instructions in article 6.3).
iRidium Cloud should be used to work with commercial iRidium licenses (in the Emulator you use the test mode of operation).
Note that when uploading the SIP Mobotix project to different control panels, different clients must be configured in the SIP driver (you can not use one client on several iRidium calling panels, just as you can not configure several doorphones as one SIP client).
For example, if configuration is correct, the smartphone with i3 pro will be the client 103, and the tablet with i3 pro - client 105.
For other Mobotix settings, see the official documentation on mobotix.com.
Customer support service by UserEcho